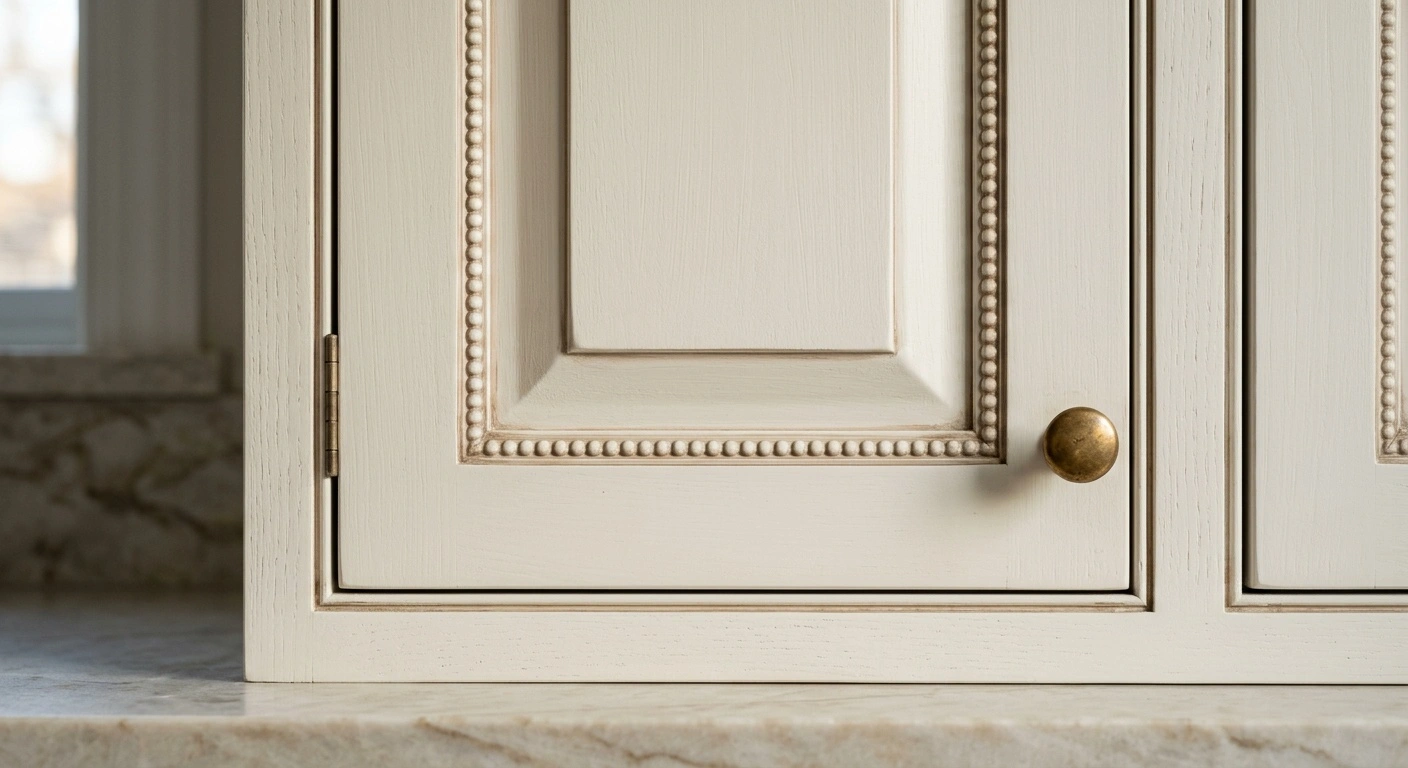
Glazed Cabinets feature a thin, translucent color coat over paint or stain. The glaze darkens profiles, corners, and joints without hiding the base finish. Finishers wipe it from broad surfaces and leave it in recesses. These shadow lines make rails, stiles, beads, and raised panels appear deeper.
Glazing is a finishing technique, not a reference to glass-front doors. The method comes from traditional furniture finishing. Craftspeople used tinted films to emphasize carving, soften new-looking wood, and imitate the depth of an aged finish.
Compared with a standard painted Shaker door, glazing requires extra material, wiping, inspection, and often another protective topcoat. For preliminary U.S. budgeting in 2026, factory glazing may add about $15 to $50 per door or drawer front. Heavily hand-worked custom finishes can add $40 to $100 or more per front.
These figures are planning allowances, not national averages. Local labor rates, door complexity, finish chemistry, samples, and color matching can change the quote substantially. Ask the cabinetmaker to list the glazing upcharge separately. You can then compare it with the same door in an unglazed finish.
How Glazed Cabinets Create Dimension
Glaze changes visual contrast rather than the physical shape of a door. Dark brown over warm white paint makes the frame’s inside edges appear deeper. Soft gray over greige creates a quieter shadow. On stained wood, glaze settles into open grain and profile cuts.
Side lighting makes the effect most visible. It becomes especially clear on raised panels, applied moldings, beaded frames, and routed edges. A clear topcoat alone may leave these details understated.
The finisher applies the base color first and allows it to dry according to the coating system. Next, the finisher brushes or sprays on the glaze. Hand wiping removes most of it while leaving controlled deposits at joints and low points. A compatible clear coat then protects the finish.
Wipe direction, pressure, open time, and room temperature all affect the result. Therefore, two sample doors may differ despite using the same color formula. Request a sample with the actual profile, substrate, base coat, glaze, and final sheen. A flat paint chip cannot show the finished effect.
Why Door Construction Matters
A basic Shaker door has a flat center panel within a square-edged frame. Two rails and two stiles form that frame. A narrow glaze line adds definition without making the door ornate. This restrained treatment often suits transitional kitchens.
A raised-panel door has a profiled center panel that rises toward the middle. Its ledges and valleys give the glaze more places to collect. As a result, the door shows greater visual movement. It also usually costs more because machining and hand wiping take longer.
Paint-grade doors may combine solid hardwood frames with MDF center panels. MDF stays flat and accepts paint smoothly, but it is not waterproof. Water can permanently swell a chipped edge or an unsealed sink-base component.
Cabinetmakers often build stain-grade doors from maple, cherry, oak, or walnut. They may use veneered center panels where dimensional stability matters. A solid-wood panel must float in grooves within the frame. Gluing its perimeter would restrict normal seasonal expansion and contraction.
Glaze may emphasize slight witness lines around a floating panel. Those lines do not automatically indicate poor construction. Instead, they often reflect the movement required in a properly built solid-wood door.
Overlay, Inset, and Visible Lines
Glazing does not determine whether a cabinet uses overlay or inset construction. However, the mounting style changes how the finished kitchen looks. An overlay door sits in front of a face frame or frameless box. An inset door sits flush inside a face-frame opening.
Standard or partial overlay leaves more of the face frame visible. Full overlay narrows the gaps between adjacent doors and creates a cleaner field of color. Dark glaze on partial-overlay cabinetry emphasizes each door perimeter and the exposed frame. In a modest kitchen, those repeated lines can look busy.
Inset doors add another line through the reveal around each opening. Cabinetmakers commonly set this reveal between 3/32 and 1/8 inch, depending on their system. Seasonal wood movement and an out-of-square installation can make small variations noticeable.
Full-overlay Shaker doors with a lightly wiped glaze tend to look quieter. Fewer exposed frame lines compete with the door detail. Before ordering, inspect a cabinet sample with two adjacent doors and a drawer front. One display door cannot show the rhythm of a full run.
Choosing a Base Color and Glaze
Subtle combinations keep the glaze close in value to the base color. Benjamin Moore White Dove with light taupe or soft umber adds warm definition without creating a striped outline. Sherwin-Williams Accessible Beige can take a muted brown-gray glaze. This pairing works well with cream quartz and medium-toned oak flooring.
For a cooler scheme, consider pale gray paint with charcoal-gray glaze. The combination can coordinate with soapstone, honed black granite, or restrained gray-veined quartz. Test it under the room’s actual lighting because cool glaze can shift blue or green.
Deep colors require a lighter hand. Broad glazing can make navy, charcoal, or forest green appear almost black. Sherwin-Williams Naval often works better with subtle black glaze limited to profile recesses. A heavy brown wipe can muddy the blue.
On natural wood, medium-brown glaze emphasizes the ray fleck and open grain of quarter-sawn white oak. Dark glaze can look blotchy on maple unless the finisher carefully controls the stain and sealer. Cherry already darkens and warms with age. Heavy brown glaze may bury its grain and complicate future color matching.
Finish Sheen and Protective Topcoats
Glaze normally forms one layer in a complete finishing system. It should not serve as the exposed final surface. Cabinet factories may protect it with conversion varnish, post-catalyzed lacquer, or another commercial cabinet coating. These systems provide chemical and abrasion resistance.
Smaller shops may use waterborne cabinet enamel with a compatible glaze and clear coat. Every product must work within the same approved system. An incompatible glaze can weaken adhesion or wrinkle beneath the topcoat.
Satin suits most glazed finishes. It reflects enough light to show the profile while hiding minor wiping variations. Semi-gloss cleans easily but highlights fingerprints, dents, and uneven color on broad surfaces. Dead-flat coatings tend to hold grime and may burnish in frequently touched areas.
Traditional oil-based alkyd paints and oil varnishes often amber with age. The shift becomes more obvious on pale colors and in rooms with limited daylight. Quality waterborne coatings resist yellowing better.
A finish may feel dry long before it cures. Some waterborne and latex coatings need up to 30 days to reach full hardness. Handle new doors gently during that period. Avoid aggressive cleaners until the manufacturer’s stated cure time has passed.
Where Glazed Cabinets Work Best
This finish suits traditional and transitional rooms with visible profile and texture. It works well on raised-panel doors, furniture-style islands, inset cabinetry, and freestanding vanities. Warm metal hardware, natural stone, handmade tile, and varied wood flooring can support the added detail.
A restrained glaze can also connect new cabinetry with an older brick fireplace, original oak trim, or an antique hutch. In a bathroom, it gives a vanity the visual weight of furniture. Elaborate carving is not necessary.
The treatment clashes with severe minimalism, uninterrupted slab doors, high-gloss surfaces, and nearly invisible hardware. Darkening every joint on a tall pantry wall creates a strong grid. That grid can make the wall feel fragmented.
Busy counters, patterned backsplashes, and varied flooring already compete for attention. Heavy glazing adds another layer. In such rooms, limit the finish to an island or vanity. An unglazed perimeter can keep the overall design calmer.
Combinations That May Date Quickly
Cream paint, very dark brown glaze, ornate raised panels, rope molding, corbels, and distressed edges create a strongly themed result. This combination became common in Old World and Tuscan-influenced kitchens. Today, it often identifies a specific remodeling period.
Glazing alone does not cause that effect. The dated appearance comes from combining dark outlines, ornament, intentional wear, and several warm brown surfaces. Brown-speckled granite and tumbled stone increase the effect. Oil-rubbed bronze on every fixture can add even more visual weight.
For a quieter result, keep the base and glaze within one or two steps of contrast. Choose a simple door profile and limit decorative moldings. Warm white Shaker doors with soft taupe glaze can work with quiet quartz and natural white oak flooring. Unlacquered brass adds warmth without outlining every surface.
Pale sage with muted olive-brown glaze also pairs well with honed marble, soapstone, butcher block, or brushed nickel. Aged brass offers a warmer alternative. If the glaze dominates from across the room, the contrast is probably too strong.
Coordinating Hardware, Counters, and Flooring
Hardware should support the shadow lines rather than add another decorative layer. Simple knobs, cup pulls, and straight bar pulls suit most door profiles. Keep the finish consistent across matching doors and drawers.
Aged brass warms white, cream, sage, and walnut finishes. Brushed nickel keeps gray or blue cabinetry from appearing too heavy. Matte black creates clear contrast, but it shows dust and greasy fingerprints on frequently handled pulls.
Quiet countertop patterns usually work better than bold, high-contrast veining. White or cream quartz, honed soapstone, restrained granite, and straight-grain butcher block allow the door detail to remain visible. Strong movement in both the counter and cabinet finish can make the room look crowded.
Natural or medium-toned white oak flooring is easier to coordinate than orange-stained oak or high-variation faux wood tile. Avoid matching every brown exactly. Walnut, brass, and oak should share a general warmth without using the same color.
Bring a finished sample door into the room before approving the order. Hold it vertically beside the actual counter, backsplash, and floor. Check it during the day and under installed lamps. Glaze often looks darker in shadow than under showroom lighting.
Cleaning and Long-Term Maintenance
Glazed profiles trap more dust and cooking residue than plain slab doors. Clean frequently touched areas every week or two. Use a soft microfiber cloth with warm water and a few drops of mild dish soap. Dry the surface after wiping.
Clean profile recesses every few months with a soft cloth wrapped around one finger. A very soft nylon brush can reach narrow corners. Do not flood the joints, especially on MDF-core doors. Water entering a chip or failed seam can cause permanent swelling.
Avoid abrasive powders, melamine foam pads, steel wool, ammonia-heavy glass cleaner, and strong degreasers. Use them only if the cabinet manufacturer specifically approves them. These products can dull the clear coat, change the sheen, or remove glaze from exposed edges.
Inspect painted doors yearly for chips around knobs, sink bases, trash pull-outs, and dishwasher-adjacent edges. Stained wood with a sound clear coat usually needs cleaning rather than routine oiling. Furniture polish and silicone products can contaminate the surface and complicate later repairs.
Thermofoil is different from glazed wood or painted cabinetry. It uses a heat-bonded vinyl layer rather than a wiped color coat. Heat from ovens, toasters, and other appliances can loosen that layer. Follow the appliance and cabinet manufacturers’ clearance requirements.
Repairing Chips, Wear, and Color Changes
A chip in a glazed painted door can be difficult to hide. The repair must match the base color, shadow color, and topcoat sheen. Manufacturer-supplied touch-up materials offer the best chance of a close match.
For a small edge chip, apply the base paint first. Then add a tiny amount of compatible glaze with an artist’s brush. Practice on a hidden edge before touching the visible damage. Stop if the repair becomes larger or glossier than the original chip.
Broad wear, peeling clear coat, or cloudy finish usually requires refinishing the entire door. Spot repairs often leave a visible halo on large flat areas. A professional finisher can also determine whether contamination or coating failure caused the problem.
Dark glaze in corners is intentional. Sticky black buildup around pulls is grease and dirt, not desirable patina. Clean those areas gently before attempting any color repair.
Strong sunlight can fade one bank of cabinets more than another. Oil-based clear finishes may also yellow on pale paint. Keep heat-producing countertop appliances away from upper doors. Heat and steam can shorten the coating’s service life.
If doors begin rubbing, adjust the hinges before assuming the wood has warped. Many concealed hinges provide side-to-side, height, and depth adjustment. Small corrections can restore even gaps and prevent edge damage.
Factory Finishing Versus DIY Glazing
Professional finishing makes sense for large kitchens, high-contrast colors, inset layouts, and commercial sprayed coatings. Applying the glaze is only one part of the job. The harder task is wiping every door to the same intensity. The clear coat must then cure without runs, dust, or adhesion failure.
A small vanity or freestanding cabinet offers a more practical DIY test. Minor variation can read as furniture character on one piece. Across a long kitchen run, the same variation may look inconsistent. Complete one sample and let it cure before working on visible doors.
Determine the age of existing paint before sanding or stripping it. Homes built before 1978 may contain lead-based paint. Sanding, scraping, and heat stripping can release hazardous lead dust. Test the coating first.
Paid contractors must follow the EPA Renovation, Repair and Painting rule when it applies. DIY workers should also use lead-safe containment and cleanup practices. Local requirements may add further restrictions.
Wear an N95 respirator for ordinary sanding dust. Solvent-based finishes and strippers require a properly fitted respirator with organic vapor cartridges. A dust mask does not protect against fumes. Provide the ventilation specified on the product label.
Consumers should not use methylene chloride paint strippers. Federal rules prohibit consumer sales because the chemical can cause fatal exposure. Choose a non-methylene-chloride product and follow every label direction.
Oil-soaked rags can self-heat and ignite. This risk applies to linseed oil, tung oil, Danish oil, and similar finishes. Spread used rags flat outdoors to dry in a safe location. Alternatively, submerge them in water inside a sealed metal container before disposal.
Approving the Sample and Quote
Ask the cabinet shop for a finished sample on the exact door construction you plan to order. Record the wood species or substrate on the back. Also note the base color, glaze color, sheen, and topcoat system. The approved sample should serve as the production reference.
View the sample in morning light, evening light, and under the kitchen’s installed lamps. Check inside corners, rail-and-stile joints, panel edges, and hardware locations. These areas show how heavily the finisher wiped the glaze.
The quote should separate door style, cabinet construction, base finish, glazing upcharge, distressing, and custom color matching. Confirm the treatment of finished end panels, crown molding, fillers, toe-kick skins, and light rail. Ask about exposed cabinet interiors as well.
Omitting glaze from visible trim or end panels can make the installation look mismatched. Also ask how much hand variation the manufacturer considers acceptable. Hand wiping naturally varies more than a single sprayed color.
Keep the approved sample after installation for future touch-up matching. Store the cabinetmaker’s finish information in a permanent household record. Do not rely on a removable paint label that may fade or disappear.
Choosing Dimension Without Excess
The best results reveal detail as you move through the room. They do not announce every door outline from the doorway. Start with sound door construction and a base color that already suits the counters and floor. Use glaze to deepen the profile rather than fix a weak palette.
Simple Shaker doors need only a restrained shadow. Raised panels and applied moldings can support slightly more contrast. In both cases, consistent wiping and a durable compatible topcoat matter more than the glaze color’s name.
For many kitchens, tone-on-tone glazing on selected cabinetry offers the most adaptable result. Consider an island, hutch, vanity, or furniture-style pantry if treating the entire room would create too many dark lines. Budget for the added labor, approve a full-size sample, and plan for careful cleaning. With restraint, the finish adds depth and craftsmanship without making new cabinetry look busy or prematurely dated.